Monday, December 18, 2017

Bandcamp, Music and Android

Here's a quick walkthrough on how to download music from bandcamp.com into your android phone.  First, you'll need to download an unzip app - Easy Unrar is free. Find it in the app store (Google Play) and download it.
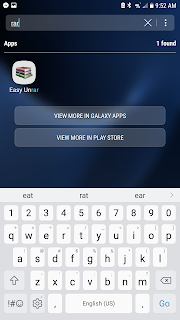
I'll throw red dots on these screenshots to make it easy for you to follow along.
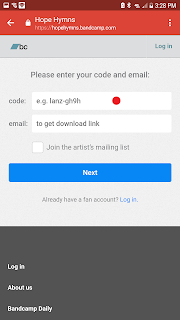


Next, get your download code and click on the link - for example, https://hopehymns.bandcamp.com/yum.  Input your code and click next.


Now click "here's how"

Click the second "Here's how", then select your file type (I used MP3 220, but I'm not a music expert so YMMV).   Then click download.


Great!  Your music is downloaded.  Now we need to unzip it.  Open Easy Unrar and click the "Download" folder.


If you've had your phone awhile, it might be tough to wade through all the downloads and find your album.  So click on the sort button on the upper right.


Choose sort by file size, large to small.


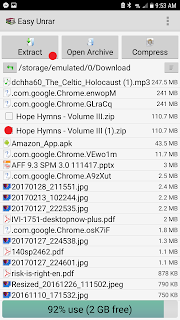
Since your album is probably more than 100MB, it should be near the top.  Here you can see Hope Hymns, the album i want.  Check the box and click Extract.


Check this box and click extract as well.


 OK - good news and bad news.  Bad news is you're not done, good news is you're almost done.  Now we need Google Music to rescan and discover your unzipped album files.  Open up the Settings app and click on Applications.


 Now find and click Google Play Music


Almost done!  Click Storage
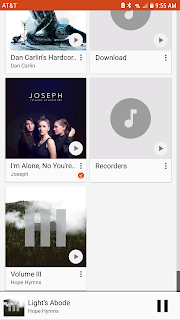


!Important!  DO NOT click "Clear Data."  DO click "Clear Cache"


Now reboot your phone, open up Google Play Music, and you're done!  Enjoy.

Thursday, September 21, 2017

Pandas

This is just a running list of useful things about Pandas as I learn.


If you have data coming in from a .csv, use this: df=pd.read_csv('file.csv')

If your dataframe has strings and you want them to be numbers, use this: df.column = pd.to_numeric(df.column, errors='coerce')

If you have date/time in linux epoch format, you can convert using this: df['date'] = pd.to_datetime(df['date'],unit='s')

If you want to index on select columns: df.ix[:,:2]

df.describe() gives you min, max, avg, mean, percentiles, and std

df.groupby([column.other]).mean()

df[column.other == ]


Grab specific columns by name: df1 = df[['a','b']]

data.iloc[:, 0:2] # first two columns of data frame with all rows

this will square each cell, skipping the first column.  df.iloc[:,1:7]=df.iloc[:,1:7].apply(numpy.square, axis=0)

great link on managing jupyter: https://www.datacamp.com/community/tutorials/tutorial-jupyter-notebook

Great guide to pandas: http://www.lining0806.com:1234/pandas/Pandas%20DataFrame%20Notes.pdf

https://www.shanelynn.ie/select-pandas-dataframe-rows-and-columns-using-iloc-loc-and-ix/
https://www.youtube.com/watch?v=POe1cufDWFs

Some images you can ignore:


Thursday, March 30, 2017

Rancher Setup Basics

A client asked recently how SolidFire can integrate with Rancher.  I had a few RHEL servers available, so I'm going to set up Rancher on RHEL.  Here are the first steps:

Install a supported version of Docker (align compatibility for Docker, K8s, and Rancher): curl https://releases.rancher.com/install-docker/1.12.sh | sh

sudo service docker start

sudo docker run -d --restart=unless-stopped -p 8080:8080 rancher/server

Alright, let's pause here.  What did we just do?  First, we installed Docker.  Docker is the software that enables you to easily download, create, run, and manage containers.  Next we made sure the docker service was running.  Last we downloaded a container that will run the Rancher software.  At this point, you should be able to reach rancher's gui at :8080.

So let's get K8s and Trident up!  First we need a place to deploy K8s.  Click Infrastructure | Hosts.

Click add host.


And then save

Then enter the IP address of the server that will function as a host for containers.  Follow the instructions to copy-paste the command into a console on your new host server.


Done!


https://docs.rancher.com/rancher/v1.5/en/installing-rancher/installing-server/#single-container

Why Rancher: http://rancher.com/beyond-kubernetes/ 

Tuesday, March 28, 2017

Understanding SolidFire Capacity

To calculate the effective capacity available, follow this formula:

  • Error Threshold (#3) minus Used Capacity (#1) = Available physical space
    • In the example below, 86.24TB - 48.41TB = 37.83TB
  • Multiply Redupe Ratio * Compression Ratio, then divide by 2 (for Double Helix)
    • In the example below, (1.81 * 1.79)/2 = 1.62:1
  • Multiply the results of (a) and (b)
    • 37.83TB * 1.62 = 61.29TB

*This calculation assumes the current rate of dedupe and compression will continue
*This calculates capacity until the Error Threshold is reached, not the Total Capacity.

From ActiveIQ, our cloud monitoring tool:

  1. Used Capacity.  This is the capacity physically taken up on disk by data.  After dedupe, compression, and double helix occur, this number is the end result.
  2. Warning Threshold.  This is an adjustable alert threshold to alert that you’re approaching the Error Threshold.
  3. Error Threshold.  This is the point after which the system cannot rebuild the second copy of data after a node loss.  This is calculated by subtracting one node’s physical block capacity from the Total Capacity.
  4. Total Capacity.  This is the raw physical space on disk.  In this example, 1.92TB * 9 SSD’s * 5 nodes = 86.42TB.

From the SolidFire GUI:
      5. Block Remaining.  This is calculated subtracting the Used Capacity (#1) from Total Capacity (#4).
      6. Block Capacity until Warning.  This is calculated subtracting the Used Capacity (#1) from Warning Threshold (#2).


***Bonus***

       7. In ActiveIQ, under Reporting | Cluster Efficiency, hover over the graph to view the dedupe and compression ratios.  In this lab system, 1.81 * 1.79 = 3.24:1

Setting up PowerShell for SolidFire


A simple Guide to setting up PowerShell for SolidFire.
  1. Enable PowerShell
  2. Download SolidFire PowerShell toolkit 
  3. Unzip the toolkit
  4. Navigate to PowerShell-master\PowerShell-master\Install\ and run SolidFire_PowerShell_1_3_1_4-install.msi 
  5. Done!

Tuesday, March 7, 2017

Trident in Action

Some screenshots of NetApp's dynamic storage provisioner for K8s!  In this case, we're using OpenShift on SolidFire.


Saturday, March 4, 2017

OpenShift, Docker, and Elasticsearch

***This is part of an ongoing series I call "Mode 1 Storage Guy goes to a Mode 2 World."  I'm not an expert (yet), YMMV.***

There are already many good setup docs for Elasticsearch on OpenShift, like here and here.  So what I'm going to do is flush out the concepts so those instructions make more sense.

OpenShift

OpenShift has a concept of a project.  This is how they provide multitenancy.

Next is namespace, which is similar to a project. 

Next is the image.  An image is a pre-packed container probably with an application installed, like MongoDB or JBOSS.  You can create new images by installing an application into a container and saving that container.  The image concept is analogous to a VM Template: you keep it updated and deploy fresh containers from it.

A stream seems to be a set of evolving images: for example, when you download the latest CentOS, you're not asking for a specific version, just the latest version.  The stream is the set of successive images that you get the latest from.

Application.  This is the normal definition of an application, however in the context of containers, it's good to think about the application as separate from a container

The catalog is a view, a view of the images held in the registry.

The registry is merely what OSE calls the collection of images, held in a folder.

A Pod is the OSE equivalent of a container

A deployment is the mechanism that manages where, how many, and replication on pods for a given application.

Persistent Volume Claim (PVC): In OpenShift, this is a request for storage.  It can sit unfulfilled.

Persistent Volume (PV): When you create a PVC, and then match it to a real LUN/Export, you have a PV.

Don't panic if you see the word "cartridge."  That's just British for container.

Some notes:
openshift's gui is very foreign. Take some time getting used to it.
Unless you're an old linux admin, you're going to need to take the linux learning curve seriously. You'll really need to brush up on vi, ls, cat, curl, and wget.
The & symbol is your friend.  For any command that appears hung (but isn't hung, it's actually running) like "docker run ", throw an '&' at the end and I betcha it'll give you your prompt back. 
I had no luck connecting to the OpenShift GUI via chrome, but firefox worked fine (remember, https and 8443)
When deploying images from docker into OpenShift, don't underestimate the Pull Secrets.  OpenShift has to be allowed to pull the images from Docker.  This mechanism is intended to prevent unauthorized access of Docker images.